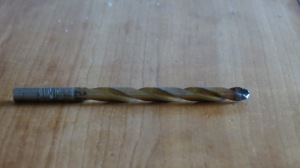
 During Pinning day Yesterday, Dave completely burned through 3 bits in about 20 minutes. Just a little bit dense…


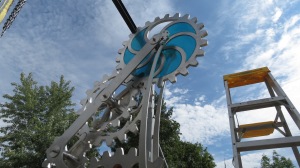
 It was a moment to freeze in time just a bit ago when the final gear got mounted.
No video, because I was working the hoist chain to lift it into place, but some great shots to give you a preview of what it will look like. 
This picture with Dave standing next to it ( he is 6’1″) gives you a sense of real life scale.
The rest of today will be mounting that last piece of glass in place, and then all the final clean and polish work in prep for the move later this week. Although the statue is imposing enough at 8′ tall, and 2000 lbs, I like this angle on it as the gears, like Kokomo, reach for the sky. 

 The base of When the Earth Moves is the Point where the largest base gear is erupting from the earth, so a smooth finish made no sense…. but the Hammered Stainless Steel looks man made and manipulated. We wanted something more natural and yet cracked looking.
After some experimentation on scrap pieces, David discovered that his air hammer made an excellent “crinkle” finish, so we are adopting that for the base.
It is much faster than hand hammering, but LOUD. Turn your volume on before hitting play…

We have talked a lot about “shiny” in these posts, but that is not the only finish for Stainless Steel. On When The Earth Moves, the base and uprights are going to be forms of Hammered Stainless.
How do you get Hammered Stainless?
This is a fun part,( although kind of back breaking) and I even got to get in on some of the action:

The protective layer on Stainless Steel comes not just from lots of polishing, but also from an acid treatment ( Nitric Acid in our case) and then a following with a citric solution. It has been so incredibly hot outside that in order to keep the acid effective, Dave has had to spritz it down with a little water occaisionally before finally washing it off. This treatment is what creates the hard chromium layer on the Stainless Steel and helps to prevent corrosion.
it is a citric solution that the statue should be washed down with once a year to remove any residual crud that might build up from sticky hands and whatever is in the water evaporating off.
All of this is well worth the effort, in the evening light you can really see the reflective glow of the shiny surfaces contrasting with the shadows.

 One of the common problems when you are building uncommon art is that the tools you need do not come off the shelf. We end up building or modifying tools to make them fit our needs as often as we buy them from the store.
In this picture you see the special gear stands David built over the weekend to hold the gears as we work on them. Once you start polishing, the last thing you want is for the materials to get scratched again… but we do not have enough flat surface that we could dedicate and cushion to prevent scratches if they were laying around.
You can also start to see the progress of all the sanding on the medium gear shown here. One of our favorites, but also painful to finish- the surfaces are nearly complete but there is still some filing and sanding to finish on those gorgeous spokes.
 You can more clearly see the difference of hours of sanding by comparing this surface of the same sanded gear on the right with
 the surface of the large base gear on the left, which has been partially descaled, but not filed or sanded.
You can see the difference not only in reflectivity, but in overall surface texture.
The large pinwheel gear, which will get the blue KOG glass in the crescents is currently on the table being sanded. You can look carefully and see different swatches of sanded or not. There are still several rounds of increasing grit fineness to go to get this gear polished and ready for acid treatment.
This weekend, we got our 1 Ton gantry home and set up. This meant the time had come to roll that 1,000 lb base off the trailer and into workspace. The gantry and hoist allowed us to control the roll of the base down the trailer ramp to the ground
That “Nan, Nan!” at the end turned out not to be too serious- merely the fact that the brand new steel wheels on the gantry were not gettig a good grip on the blacktop drive and the entire gantry was sliding forward… oops. I quickly grabbed it, got re-positioned where i could act as an added break, and the offloading continued:
That is our neighbor Bill, a retired Chrysler worker, who is pitching in with some of the heavy lifting on days when Nan’s body does not cooperate.
Soon enough, we had all wheels down on the ground and safely ready for the next phase of the adventure:

We got the call that we could come and pick up the base from Stephen’s Machine, and were filled with a mix of excitement and nervousness. Nan had been sick for days, battling some odd virus, so Dave prepped and organized for transport. Luckily we got a fever reprieve window to record our baby coming home, and although it had the potential to be catastrophic in Dave’s mind, all of his prep and the professionals at Stephen’s meant that it went smoothly and easily.
There were two goals for the morning. First, of course, bring her home. Second, create the base template. While forklifts were going to have the half ton base lifted and moving, this was the perfect chance to set her on plywood and create a template of the base for the site prep crew, allowing them a model for where to drill holes, rather than relying on measurements alone.
Before we even started with the transfer into Maynard ( our trailer), Dave worked with the crew at Stephen’s to get the template drawn.
Then, it was time for the transfer. It went quickly and painlessly. The little cart you see her being transferred onto in the trailer is the one Dave and his dad were building when he learned some new technique lessons.
You don’t just toss a thousand pounds of stainless steel love in the back of your trailer and drive off, it needs to be blocked and braced and locked into place.
 In case you did not get a good look at the current state of the base with all the movement in the videos, here is a static shot. A few days of polishing and she will be glistening.
This weekend will be the non-fork truck unloading of the base at home , and installation of the gantry to start with the piecing of the parts. There has also been incredible hours of polishing this week, so more sneak peaks at the progress on the gears- stay tuned!