 During Pinning day Yesterday, Dave completely burned through 3 bits in about 20 minutes. Just a little bit dense…


During Pinning day Yesterday, Dave completely burned through 3 bits in about 20 minutes. Just a little bit dense…

 The base of When the Earth Moves is the Point where the largest base gear is erupting from the earth, so a smooth finish made no sense…. but the Hammered Stainless Steel looks man made and manipulated. We wanted something more natural and yet cracked looking.

After some experimentation on scrap pieces, David discovered that his air hammer made an excellent “crinkle” finish, so we are adopting that for the base.


It is much faster than hand hammering, but LOUD. Turn your volume on before hitting play…

We have talked a lot about “shiny” in these posts, but that is not the only finish for Stainless Steel. On When The Earth Moves, the base and uprights are going to be forms of Hammered Stainless.
How do you get Hammered Stainless?
This is a fun part,( although kind of back breaking) and I even got to get in on some of the action:

The protective layer on Stainless Steel comes not just from lots of polishing, but also from an acid treatment ( Nitric Acid in our case) and then a following with a citric solution. It has been so incredibly hot outside that in order to keep the acid effective, Dave has had to spritz it down with a little water occaisionally before finally washing it off. This treatment is what creates the hard chromium layer on the Stainless Steel and helps to prevent corrosion.
it is a citric solution that the statue should be washed down with once a year to remove any residual crud that might build up from sticky hands and whatever is in the water evaporating off.
All of this is well worth the effort, in the evening light you can really see the reflective glow of the shiny surfaces contrasting with the shadows.


As the finish process on the Gears starts to come to a close, the structural work begins.
 The first First step is getting the uprights in place and a small gear topped on…
Once you have that, what else could you expect to happen?

 One of the common problems when you are building uncommon art is that the tools you need do not come off the shelf. We end up building or modifying tools to make them fit our needs as often as we buy them from the store.
In this picture you see the special gear stands David built over the weekend to hold the gears as we work on them. Once you start polishing, the last thing you want is for the materials to get scratched again… but we do not have enough flat surface that we could dedicate and cushion to prevent scratches if they were laying around.
You can also start to see the progress of all the sanding on the medium gear shown here. One of our favorites, but also painful to finish- the surfaces are nearly complete but there is still some filing and sanding to finish on those gorgeous spokes.
 You can more clearly see the difference of hours of sanding by comparing this surface of the same sanded gear on the right with
 the surface of the large base gear on the left, which has been partially descaled, but not filed or sanded.
You can see the difference not only in reflectivity, but in overall surface texture.
The large pinwheel gear, which will get the blue KOG glass in the crescents is currently on the table being sanded. You can look carefully and see different swatches of sanded or not. There are still several rounds of increasing grit fineness to go to get this gear polished and ready for acid treatment.


We got the call that we could come and pick up the base from Stephen’s Machine, and were filled with a mix of excitement and nervousness. Nan had been sick for days, battling some odd virus, so Dave prepped and organized for transport. Luckily we got a fever reprieve window to record our baby coming home, and although it had the potential to be catastrophic in Dave’s mind, all of his prep and the professionals at Stephen’s meant that it went smoothly and easily.
There were two goals for the morning. First, of course, bring her home. Second, create the base template. While forklifts were going to have the half ton base lifted and moving, this was the perfect chance to set her on plywood and create a template of the base for the site prep crew, allowing them a model for where to drill holes, rather than relying on measurements alone.
Before we even started with the transfer into Maynard ( our trailer), Dave worked with the crew at Stephen’s to get the template drawn.
Then, it was time for the transfer. It went quickly and painlessly. The little cart you see her being transferred onto in the trailer is the one Dave and his dad were building when he learned some new technique lessons.
You don’t just toss a thousand pounds of stainless steel love in the back of your trailer and drive off, it needs to be blocked and braced and locked into place.
 In case you did not get a good look at the current state of the base with all the movement in the videos, here is a static shot. A few days of polishing and she will be glistening.
This weekend will be the non-fork truck unloading of the base at home , and installation of the gantry to start with the piecing of the parts. There has also been incredible hours of polishing this week, so more sneak peaks at the progress on the gears- stay tuned!

Almost everyone has a mental image of Stainless Steel as smooth and almost reflectively shiny. However, it does not start life that way. There are many potential paths to shiny, and this week was dedicated to mapping it out for When The Earth Moves. To get the finishes we want, (they will be different for the gears and the fixtures ), and there will be a variety of steps from acid treatments, disc grinding, die grinding and orbital sanders. The sanding will range from 80 grit to 120.
Why so much work? Besides the fact that the steel comes in fairly “crusty”, the water jet leaves marks as it cuts as well.  This is a gear tooth as it comes from the cutter. Note all of the horizontal gauging and scratches in the steel from the cuts. This is not at all the look and feel of the gear that we want, so the surface has to be finished to get the right effect.
You can see the difference when you look at another tooth on the same gear, after acid, disc grinding and lots of sanding at various grits- this is the shiny smooth finish that is the goal. At about 20 minutes ( for the edges, not the faces) per tooth, and 94 teeth in the statue, plus faces, spokes and cutouts, you can understand why we often say that Art is a Labor of Love.
 All of the steel parts came back from being cut at the water jett shop and we had our parts check and first welding consult with the folks at Stephen’s Machine Shop in Kokomo yesterday. That is Ken ( on the right) and Steve ( on the left)- who are working with us to get the base prepped and welded. We decided to work with folks who weld Stainless all day every day to ensure that the base is completely secure. We also believe that art is collaborative and like to work with local professionals who can help us out.

Parts check means that we go through stacks of parts, checking cut, sizing and fit. We also needed to talk through where the base welds need to be placed and how to avoid warpage to the stainless as much as possible.

This is the base gear – you can see the flat edge where it gets welded down to the base plate.
The long bats will get filled with Kokomo Opalescent Glass, and the rounds will remain open.
 Parts checking is not just all marveling at the beauty of the pieces and playing with forklifts.
It is also time for careful measurement checks – here you can see Ken with his calipers, checking hole sizes; lining up pieces to make sure that the alignments came out correctly, and lots of talking and planning. Once the pieces are welded, it is too late to find out about misunderstandings or mis-communications. Like any other project, the up front planning is critical to success. We were very pleased with the amount of time and thought Ken and Steve contributed to making sure that the piece gets done correctly.

 Activity on the Statue for the City of Kokomo is really starting to get rolling.
As much as possible, it is our policy to use local businesses and local labor when we need services, and we are enjoying working with Stephens Machine in Kokomo for some of the metal work. The sheets of Stainless Steel got delivered this week- you can see the sheet of half inch steel on the forklift here. This is used for the bracing and structural elements of the statue, and the one inch steel is what the gears themselves will be cut from.
As we prepped for delivery ,my email stream became flooded with the discussion between David and Stephen’s- this up front conversation is critically important and harkens back to the old adage of “Measure Twice, Cut Once”. Numbers and measurements on a CAD file are one way of communicating, but there is often more than one way to achieve the same results and the process can have a big impact on the final results. The discussion was a great collaboration – Stephens is a really great partner in this endeavor.
The steel is being cut with a Waterjet.
 Although a plasma cutter could cut steel of this thickness, it would leave burn marks on the edges, which would destroy the clean look we have designed. Water jetting is an interesting process, where high pressure water with small garnet particulates becomes the “blade” that cuts through the steel. In this close up image, what looks like a drill bit is actually a small stream of water.
The Surface in these pictures looks brownish because of the small garnet particles that are in the water. 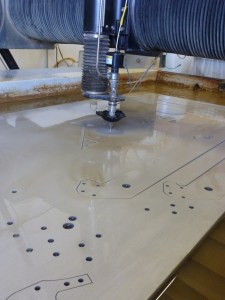 We anticipate that water jetting will continue through the end of Monday, and then the parts will be delivered back to Kokomo sometime mid-week. For us, that begins the fun of finishing, assembly and welding.

